Intro to Kubernetes Series - Part 1 - What is Docker?
There is a pretty good amount of chatter around IT infrastructure these days regarding buzzwords like "serverless", "containerization", "infrastructure as code", "agile", "devops", and the like. Through the next series of articles on Kubernetes, I hope to unravel the tightly wound tangle of technologies and concepts surrounding the next generation of infrastructure management.
If you're using a Windows machine, you'll want to make sure that Hyper-V and Container support is enabled, as Docker spins up a Hyper-V VM to host the docker engine. This can be done in the Turn Windows Features On or Off menu.
The defaults for Hyper-V will work just fine for our purposes.
*if you're using a Windows VM as I am, you'll need to enable nested virtualization: https://docs.microsoft.com/en-us/virtualization/hyper-v-on-windows/user-guide/nested-virtualization


Once downloaded, you'll want to run the executable as administrator. Right click on the installer and click "Run as Administrator". The install will kick off the download of the software and walk through some steps.

Once you decide on which OS's you'd like to support, click Ok, and the install will begin:

Who this article is intended for:
This article is written for those who have a basic knowledge of powershell/bash, an understanding of VM's and their architecture, and an interest in understanding how to implement and use containers within Docker Desktop with the larger goal of understanding how docker fits into Kubernetes.Before we begin:
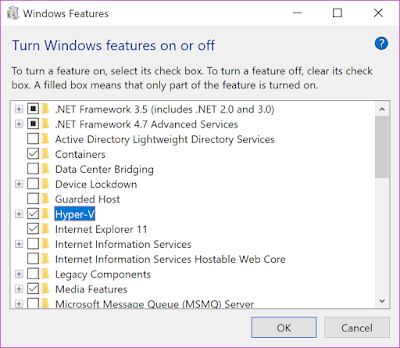
During this demo, I will be walking through various steps to install and configure Docker Desktop. We'll go through the steps to download, install, and configure the Docker environment. If you prefer to avoid doing this on your workstation, its possible to install Docker desktop in a VM if you prefer to test it out before installing it somewhere where it'll be used regularly.If you're using a Windows machine, you'll want to make sure that Hyper-V and Container support is enabled, as Docker spins up a Hyper-V VM to host the docker engine. This can be done in the Turn Windows Features On or Off menu.

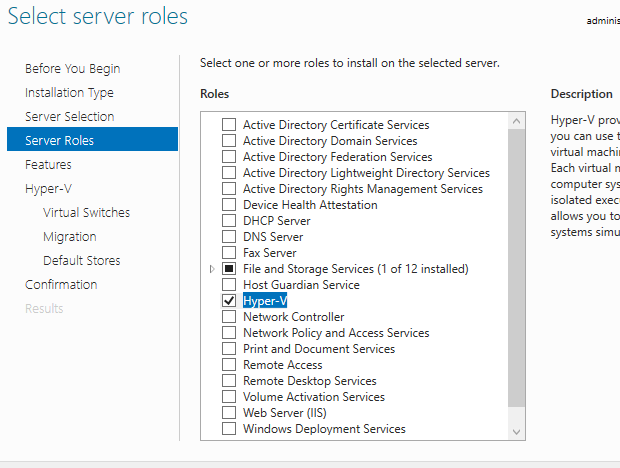 |
| Windows Server 2016 Roles Menu |
 |
| Windows Server 2016 Features Menu |
The defaults for Hyper-V will work just fine for our purposes.
*if you're using a Windows VM as I am, you'll need to enable nested virtualization: https://docs.microsoft.com/en-us/virtualization/hyper-v-on-windows/user-guide/nested-virtualization
What is koob-er-NET-eez anyway?
In short, Kubernetes is a container infrastructure automation suite. It handles the rudimentary tasks surrounding the creating of infrastructure and attempts to simplify the way you interact with the workloads. It removes the tedium of managing infrastructure so you can focus on the functionality of the containers themselves. We'll start with where these workloads live within Kubernetes by looking at where the work happens: ContainersContainerization is a space hotel
Stick with me on this while I attempt to make things easier to conceptualize. Stripping away as much of the technical mumbo-jumbo to get to the heart of it, a container is really a runtime environment running on a host-level container engine that shares it's kernel. "Josh, that is not the simplest way to put it! I have no idea what that means!" You'd be right to say that, that's exactly what I said when I first dove into the web of containers. So let me paint you a picture of a not-so-perfect analogy:
When you think of a car, it has its own engine, doors, wheels, fuel, and all the electrical goodies you would want when you're driving yourself along. It is a complete solution. You can think of the chassis and wheels of the car itself as your physical servers kernel, the engine and electricals as your runtime environment, and yourself as the OS. You, as the OS, rely on the entirety of the environment to operate.
 |
| Computers crash sometimes |
Now imagine, say, a large trailer, hauling multiple cars. In this analogy, this can be seen as a sort of hypervisor, like ESXI or Hyper-V. Where you have the individual cars that can all be run independently (even though they can't really "go"), with their own engine and their own fuel, their own tires and individual air conditioning units. Rather inefficient, since they're all effectively going to the same place.
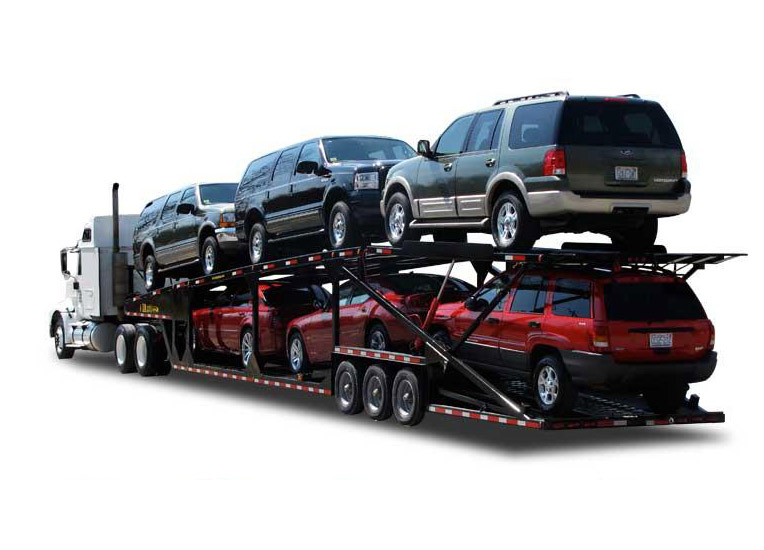 |
| It's like a really inefficient train |
To imagine something like a container, consider that you are sitting within a cabin and on the inside you get all your conveniences of radio, air conditioning, snacks, books, whatever you'd need to keep you happy or perform any sort of work you'll need to do, and everything happening outside of that cabin is handled by one master-entity. You don't necessarily know or care where the resources are coming from, but you're still getting them. In this analogy, you'd be sitting in kind of a space-age mobile hotel docked to a space station, feeding your little cabin electricity, fresh air, and handling all the little things like steering and communications for you. You're borrowing the power plant (kernel) of the space station to fuel all of the things you need in your cabin without having to waste time or thought to anything outside of it.
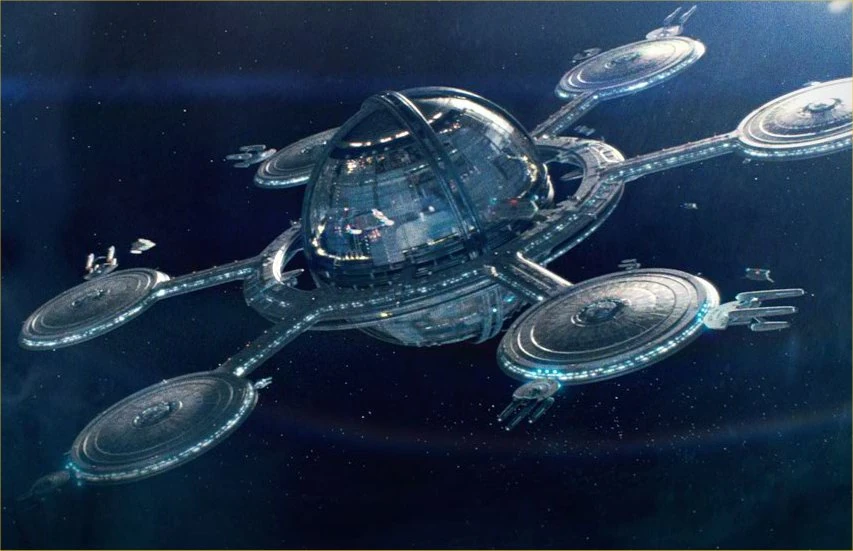 |
| Kubernetes, infrastructure of tomorroooooow! |
Maybe the space hotel idea is a bit out there. The idea is that with the software running within the container, as long as it's packaged with its dependencies (drivers, SDK packages, etc), can use the kernel of the host OS to perform work instead of needing to be packaged with it's own kernel as is the case with traditional VM's. The overall benefit is that you can run more containers on less hardware.
See, totally not complicated at all. Still with me? Great, let's move on.
Container Engines
There are many types of container engines. For the purposes of these articles, we're going to pretend that only one exists: Docker. I'll spare you the details of why, but it's pretty much the only one anyone uses in the IT industry. Docker is widely universal and very well documented. So it should be easy to get started with right? So why, yet, another article?
There are plenty of articles out there that explain how to use containers. In my opinion, most of them miss the mark on the "how". If you're like me, you learn best by actually doing. If you're willing to follow along, I'll walk you through getting up and running from start to finish with building your own docker environment.
There are plenty of articles out there that explain how to use containers. In my opinion, most of them miss the mark on the "how". If you're like me, you learn best by actually doing. If you're willing to follow along, I'll walk you through getting up and running from start to finish with building your own docker environment.
Docker Setup
The best thing about these technologies is also one of the worst thing about these technologies. They're constantly being updated. Because of this, walkthroughs explaining how to set them up go out of date very quickly. This is current as of the publishing of the article and should help with removing any doubts about whether the instructions are applicable.
Docker account
If you don't already have one, the first thing you'll need to do is create a docker account:
- Go to https://hub.docker.com/signup
- Enter in the required info. I just used "Test" or "Home" for company.
- Confirm your email
- Log in!
The docker hub is a giant shared storage environment where everyone can publicly or privately host their docker images (we'll get into those later). You will also be hosting a docker image here during this walk through.
Once you have your account, the next step is to install docker on the machine you wish to run it on. I'll be using a Windows Server 2016 VM for the examples, but I'll include steps for Ubuntu 18.06 Linux as well.
Docker install
The installation of docker is fairly straight forward. On Windows, we'll be using a .exe executable to install the docker engine. On Linux, we'll run the install command to download and install docker from the official Ubuntu repository.
Otherwise, continue on with the steps below.
To get the windows installer, you can go to https://www.docker.com/ then click Products, and then click Desktop.
Windows
If you wish to skip the process of logging into the website and navigating to the download page, the installer can be downloaded with this link: https://download.docker.com/win/stable/Docker%20for%20Windows%20Installer.exeOtherwise, continue on with the steps below.
To get the windows installer, you can go to https://www.docker.com/ then click Products, and then click Desktop.

Then in the next screen, click "Download Desktop for Windows or Mac".

Which redirects you to yet another screen where you click "Download Docker Desktop for Windows".

Once downloaded, you'll want to run the executable as administrator. Right click on the installer and click "Run as Administrator". The install will kick off the download of the software and walk through some steps.

On the first available screen you'll need to make a choice as to whether you want your Docker environment to support Linux or Windows containers. The first gotcha here with containers is that you cannot mix and match kernels like you can with VM's. If you wish to run Linux containers, you must run docker in a Linux environment.
On Windows machines, Docker handles this by creating a VM in Hyper-V with a Linux OS and installing docker on it. On a bare-metal Linux machine, Windows containers are not supported. In this demo, I'll only be covering Linux containers on Windows. So, if you're following this walkthrough, just leave the "Use Windows containers..." box unchecked.
On Windows machines, Docker handles this by creating a VM in Hyper-V with a Linux OS and installing docker on it. On a bare-metal Linux machine, Windows containers are not supported. In this demo, I'll only be covering Linux containers on Windows. So, if you're following this walkthrough, just leave the "Use Windows containers..." box unchecked.
Once you decide on which OS's you'd like to support, click Ok, and the install will begin:
When it finishes, it'll prompt you to log out:
 After the install, depending on when this was updated last, you may be prompted to update your docker install. Simply click "Install Update" on the prompt and it'll handle everything automatically. This will restart your docker instance.

Now we have docker installed on our Windows-based computer. To verify, open a powershell window and use the command docker version to get an output of the currently installed docker engine.


After this runs, you should see the output similar to the following:


With all those pieces in place, now we can do the fun part (for real this time!). The next command does a couple of things, it tells the docker engine to build a new container using the helloworld image, but run it in detached mode (simply meaning that it's running in the background) using the -d switch, and to expose the container port 8000, the port we specified our webserver to run on in the dockerfile, on the host computer as port 80 with the -p switch. This will let us browse to http://localhost to view our wonderful new web app.


Now we have docker installed on our Windows-based computer. To verify, open a powershell window and use the command docker version to get an output of the currently installed docker engine.

Ubuntu
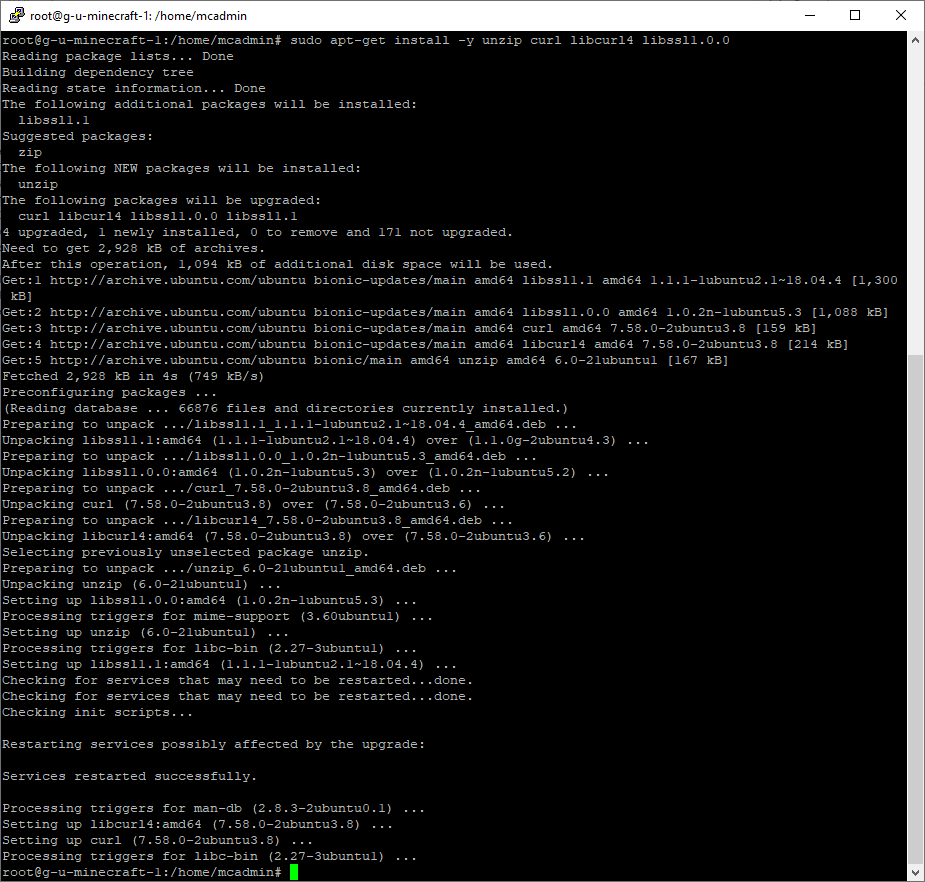
For Linux, things are a bit simpler. running the sudo apt install docker.io command will begin the install from the official Ubuntu repository.
You'll be prompted for the admin password, then the install will kick off, asking you to authorize the use of additional space.
Typing 'Y' and pressing enter will complete the install.

It essentially downloads all the required packages and installs them where they'll be needed.
Once installed, run sudo systemctl enable docker to enable the docker commands and engine.
You should then be able to type in sudo docker version and get the same info as above. You now have a functioning docker install living on your Linux environment!
Phew, with installation out of the way, now we can move on to the important stuff.
Now, before we move on, we want to make sure that we're logged into our docker account within the docker instance so that we can use the docker hub features later in this article. In your powershell console, use the docker login command to connect your instance with your docker account. I've used the insecure method here that passes your password as plain-text, but you could also use the -password-stdin, or the UI by right clicking the docker tray icon, and clickin "sign in" if your username doesn't already appear there.
Console:
UI:
OK, so what can I do with docker?
At this point, we have the bare minimum of docker being installed. We'll walk through a series of demos to get a good idea of how docker works and what makes it so valuable. Well start by building a quick "hello world". Then we'll create a new docker image using docker files, build a container with it and connect to it with a web browser. After walking through the basics, we'll go through the process of creating and maintaining a repository image.
It sounds simple, and it is if you have plenty of experience with docker. If you're still unsure about what all that means, keep following along while I dig into the details of what all this jargon actually means.
It sounds simple, and it is if you have plenty of experience with docker. If you're still unsure about what all that means, keep following along while I dig into the details of what all this jargon actually means.
Hello World, docker style.
One thing I find is common in walkthroughs like this one is that they become a list of commands for you to cut and paste with no thought to exactly what it is you're pasting. My intention here is for you to understand exactly why we're doing things the way we're doing them.
Before we even execute our hello-world build, I'd like to spell out a few docker commands so that we're all on the same page with what we're actually doing. These are the ones we're concerned with in this section.
docker - Pretty simple. This is just the top level command to call the docker program from the command line. It'll spit out a list of available commands. It's syntax is docker [options] command.
docker ps - This will list all the containers in your docker instance.
docker kill - This command is used to stop a running container.
docker rm - This command is used to remove a container entirely. Once this is used, the container is no longer available to be accessed. Consider it the opposite of docker run.
docker run - This one is the one we'll use most off the bat. It calls an available image, locally if saved, or from the docker hub if it isn't, and kicks off a container with the default settings. This commands syntax is docker run [options] image [command] [arg...]. In simpler terms: "Start up a container with this image and these settings". There are a ton of things that go in the options and command spots. We likely wont cover them all. If you'd like to see the entire list, a reference can be found here: https://docs.docker.com/engine/reference/commandline/docker/
docker build - This is a command we'll use to build, or compile, a docker image from a dockerfile and source files.
Now with a basic understanding, we'll kick off the hello-world container from an image stored in the Docker hub. It's a default testing image that is well suited for making sure the core functionality of our docker instance.
First, open your command line interface where we tested with docker version previously. This time type in docker run hello-world and press enter. The command should spit out an output like the one below:
PS C:\Users\Administrator> docker run hello-world
Unable to find image 'hello-world:latest' locally
latest: Pulling from library/hello-world
1b930d010525: Pull complete
Digest: sha256:6540fc08ee6e6b7b63468dc3317e3303aae178cb8a45ed3123180328bcc1d20f
Status: Downloaded newer image for hello-world:latest

Hello from Docker!
This message shows that your installation appears to be working correctly.

To generate this message, Docker took the following steps:
 1. The Docker client contacted the Docker daemon.
 2. The Docker daemon pulled the "hello-world" image from the Docker Hub.
    (amd64)
 3. The Docker daemon created a new container from that image which runs the
    executable that produces the output you are currently reading.
 4. The Docker daemon streamed that output to the Docker client, which sent it
    to your terminal.

To try something more ambitious, you can run an Ubuntu container with:
 $ docker run -it ubuntu bash

Share images, automate workflows, and more with a free Docker ID:
 https://hub.docker.com/

For more examples and ideas, visit:
 https://docs.docker.com/get-started/
Congrats, you just executed a container workload! Next we'll run something with a bit more persistence.
Hello World, pt. 2: web apps
A bit of a misnomer, sure, but we'll be building a quick and dirty web app container that simply serves up some text. With this demo, we'll use the docker build command. First, lets get our heads around docker files.
Dockerfiles
Containers are built from what Docker calls an "image". You can think of an image as a snapshot of an operating environment, whether it's an OS or some type of runtime environment running serverless code. These images are compiled using dockerfiles.
Dockerfiles are simplest to understand if you think of them as a script. They're just very simple scripts that tell docker how to assemble and configure a container image. There are a ton of commands that can be injected (more info here: https://docs.docker.com/engine/reference/builder/ ) Here's a look at the one we'll use:
Dockerfiles are simplest to understand if you think of them as a script. They're just very simple scripts that tell docker how to assemble and configure a container image. There are a ton of commands that can be injected (more info here: https://docs.docker.com/engine/reference/builder/ ) Here's a look at the one we'll use:
FROM busybox:latest
ADD index.html /www/index.html
EXPOSE 8000
HEALTHCHECK CMD nc -z localhost 8000
CMD trap "exit 0;" TERM INT; httpd -p 8000 -h /www -f & wait
Let's go ahead and break this down so we know what's going on here.
Line one is basically telling docker what base image to use to build our container. Usually this is an OS that's been packaged up as a docker image for this exact use. In this instance, it's BusyBox.
Line two is using the ADD command to inject the file index.html from the directory we're working from in the command line to the specified destination: /www/index.html. We haven't created this yet, but we will.
EXPOSE is a command used to open a TCP port through the docker proxy to the container. It's basically a port forward command. In this case, we're telling docker to expose port 8000 for this container so we can access it as a web page.
HEALTHCHECK tells the docker engine that the container is ready to accept traffic. This happens by periodically running a command against the image. If that internal command returns without error, the container is marked as healthy. In this example, the nc command (a linux version of a port check) tests the localhost to make sure that port 8000 is responding.
The last line is a few different commands rolled into a single line, separated by semi-colons. CMD allows the file to pass a command directly to the operating system in the container. The specific goal of the commands on this line are to start up a web service on port 8000 using the files in the /www directory. I won't dig into the syntax of the commands here since they're linux specific. If we were using Windows containers it could be powershell commands. Just know that it's the important line for getting the web server online.
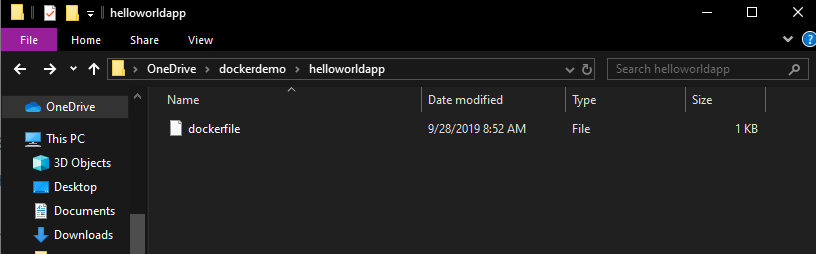
The important part is how we save the file. The dockerfile is extension-less. If you're using notepad, you'll need to change the filetype to "all" and then save the file as "dockerfile", with the quotes included. By default, docker looks for the dockerfile to be named "dockerfile". You can name it something else, but you'll need to specify that path in your docker build command later.
I created a folder specifically for this container build so that it could hold all the files I would need when I build this container later. You'll see in the picture below that the file type of the docker file simply says "file" instead of "text file". This is what you're aiming for.
The last line is a few different commands rolled into a single line, separated by semi-colons. CMD allows the file to pass a command directly to the operating system in the container. The specific goal of the commands on this line are to start up a web service on port 8000 using the files in the /www directory. I won't dig into the syntax of the commands here since they're linux specific. If we were using Windows containers it could be powershell commands. Just know that it's the important line for getting the web server online.
The important part is how we save the file. The dockerfile is extension-less. If you're using notepad, you'll need to change the filetype to "all" and then save the file as "dockerfile", with the quotes included. By default, docker looks for the dockerfile to be named "dockerfile". You can name it something else, but you'll need to specify that path in your docker build command later.
I created a folder specifically for this container build so that it could hold all the files I would need when I build this container later. You'll see in the picture below that the file type of the docker file simply says "file" instead of "text file". This is what you're aiming for.
Since we've now created a reference to the index.html file, we'll have to go ahead and create that file. Simply open up a notepad instance and paste some web code into it, then save it in the folder with your dockerfile. I've entered an example below. If you're using notepad, be sure to change the file type to all files, and save the file as index.html.
<xmp>
Hello World


                                       ##         .
                                 ## ## ##        ==
                              ## ## ## ## ##    ===
                           /""""""""""""""""\___/ ===
                      ~~~ {~~ ~~~~ ~~~ ~~~~ ~~ ~ /  ===- ~~~
                           \______ o          _,/
                            \      \       _,'
                             `'--.._\..--''
</xmp>
This way, when the docker file tries to add the index.html file, it'll find it in the working directory.


Now you're ready to build your container from a dockerfile. In your console of choice (powershell shown here). The docker build command shown here is intended to be run after navigating to the directory of the dockerfile beforehand, designated by the use of "." if you wish to run the command without changing directory, you'd simply replace the period with the path to the directory that holds your dockerfile. The -t switch allows us to name and tag the new image.
docker build . -t helloworld:latest
After this runs, you should see the output similar to the following:
Now that we've compiled our image we can check to see if it's listed in our local images registry with:
docker image ls
We can see our helloworld image as well as our busybox image used to build it. Now that we have our compiled image with all of our settings, all we have to do is run the image to create a new container.
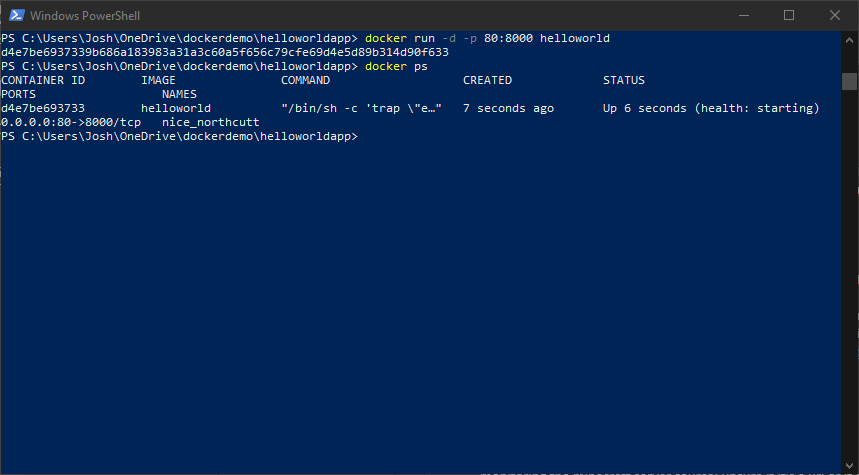
With all those pieces in place, now we can do the fun part (for real this time!). The next command does a couple of things, it tells the docker engine to build a new container using the helloworld image, but run it in detached mode (simply meaning that it's running in the background) using the -d switch, and to expose the container port 8000, the port we specified our webserver to run on in the dockerfile, on the host computer as port 80 with the -p switch. This will let us browse to http://localhost to view our wonderful new web app.
docker run -d -p 80:8000 helloworld
Here you see that I've built the container with docker run, then used docker ps to view the running containers. As you'd expect, our container is listed there with a random name. If you wish to name the container, you can add in the --name switch followed by the name you wish to give to the container.
Unfortunately the formatting of the output is a bit sketchy, but the information is all there. What the output is telling us is that we have a container, named nice_northcutt, using the image helloworld, with a container ID of d4e7be693733, forwarding port 80 to port 8000 over TCP, with how long ago the container was created, and its status (starting) which is the output of our health check parameter we specified in our dockerfile.
All that's left is to browse to our local host and see if our app is running. You can open a browser of your choice and type in http://localhost into the address bar and then:
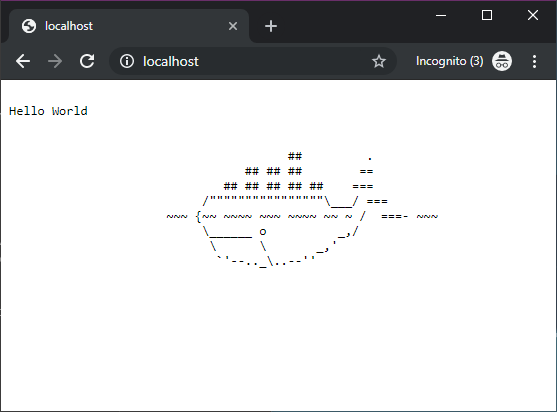
All that's left is to browse to our local host and see if our app is running. You can open a browser of your choice and type in http://localhost into the address bar and then:
There you have it, our lovely docker whale! But wait! There's more! Now that we know our image is working correctly, we can push the image to the docker hub.
After this short exercise, you can probably see the value in declaring a couple of files and, with a few lines of commands, build and run a functioning web app without the fuss of building up VMs and configuring firewalls and ports within the VM's OS. This is where docker and containerization shines.
Docker Hub and Maintaining Images
The next step is to relate this to how you might use it in an environment where you may need to be able to change things quickly. In the next section, we'll publish our image to a docker repository, then update the source image and push the update image to our repository, completing an update cycle.
Docker Repositories
We'll need to log into the dockerhub with our docker account we created earlier. Once logged in, you'll want to create a new repository by clicking the "Create Repository +" button in the upper right of the page. You'll see the next page below where you'll enter in the information to create the repo.
Note: this doesn't seem to work with IE.
Once you click "Create" at the bottom, you'll be presented with the following page.
So now with that in place, we can upload our new helloworld image to the repo:
First we need to tag our image so the docker engine can associate the image with the repo. We'll need to get the image ID using docker image ls and copying it down so we can use it later. My specific ID is shown below, yours may be different so be sure to update the command with the ID from your docker image. After the image ID, you'll need to tell the docker engine what repo and tag you want to give associate with the image. The tag is just a logical descriptor of the image itself. For instance, an update version, or perhaps you have a "lite" version of an image you can use that as your tag. Each version of the image with different tags will be available in your repo. I've gone with "initial" so that I know this is the very first one.
docker tag a58f98037376 jfranzen/dockerdemohelloworld:initial
Now you can see that the image has been tagged as a separate instance in our local image registry. Now we can push the image to the docker repo:
docker push jfranzen/dockerdemohelloworld
The console will output some progress bars for the uploading of the image, and the give a final read-out:
Once we can see that the image has been pushed, we can check our repo in the docker hub.
That was a lot of work! If you're still following along and managed to get everything working as shown here, give yourself a good pat on the back because this stuff isn't easy. Chances are by this point you've had to google at least a couple things to figure out why your specific configuration isn't working as expected, and that takes dedication. Well done!
At this point, you can test your repo image by building the container again with the docker run command we used earlier. Before we do this, we'll want to make sure the previous container is no longer running, thus holding up our exposed port. You can accomplish this by running docker ps to get all the running container ID's, and then running docker kill to remove the container.
Once the old container is cleaned up we can create our new one from our repo:
docker run -d -p 80:8000 jfranzen/dockerdemohelloworld:initial
You'll see in this version that the image is now showing our image from the repo: "jfranzen/dockerdemohelloworld:initial" instead of our local image "helloworld", proving that the image came from dockerhub. Once again, you can open http://localhost on your browser to show that the container is running as expected.
Just when you thought you were done: Now we get to update the image! That's right, we're going to compile and push a v2 of our image and test it. In reality, all we're doing is updating the index.html, rebuilding the image, tagging it and pushing it back to the dockerhub. I'll be a bit more concise here:
Open the index.html file and make an edit, you can see my complete overhaul of the web page below:
Once we've made all of our changes to the web app, we can rebuild the image with our docker build command.
A quick note: you can simultaneously tag an image with multiple tags during the build, as well as tagging it to the repo, removing a step from the process. Once the tagging has completed, you can move on to pushing it. It's good practice to add the "latest" tag to the most recent build, as docker will use that tag by default if a tag is not specified.
 |
| The output of "Later already exists" is the result of me already having these tags in place. However if you push a new image with the same tag, it'll be overwritten. |
And finally test to verify our newest image is available. You could also run this without the ":v2" and it will pull the image tagged with "latest" by default.
Tadaaaa! We've completed a single update cycle by updating the image and then manually rolling out a new version. Later in the series we'll utilize the features built into Kubernetes to do all of these things for us with no down-time.
Wrapping up
At this point you can see how useful docker is when it comes to deploying workloads, along with updating and maintaining the images used to deploy them.
We've learned how to:
- Install and validate Docker
- Build a container image
- Create a container image repository
- Push an image to that repository
- Build a container from that image
- Update and push the new image to the repository
It was a lot of work, but you now know enough about Docker to move to the next section of our Kubernetes mini-series: actually using Kubernetes. The fun part about Kubernetes is that we get away from the little details around maintaining the images and do more with actually architecting the workflows using images that are already in the Dockerhub. The important takeaways here are really based in how docker knows where to get the images and understanding the workflow the images undergo to get there. Throw yourself a party for making it through the article and give your brain a rest, then continue on with the next article with the intro to Kubernetes.


Comments
Post a Comment