Automating VM creation with DSC in Azure.
In this article, I describe my solution to going from nothing to a fully configured Windows Server VM in Azure. I'll explain the process of configuring Azure Automation accounts, DSC resources, and constructing the script that makes use of both. Read on for more!
As I was setting up VM's in Azure for another article, I found that I was unsatisfied with how slow setting up VM's in Azure was. I wanted to have a short prompt and then deploy a VM from zero to a configured role-installed Microsoft Server, ready for use. Before setting off to the solution i'm about to describe, I scoured the internet looking for solutions that had already been done (like I discovered with Lability while creating my VM automation tool, argh!). But this time, the only thing I saw was either automating the creation of the VM, or automating the configurations of the VM after it was already created. The following setup will allow the user to input a couple of parameters in a function and have a working server with the desired roles installed. Ready to feel like a techno-wizard?

Before we can actually use any of the configurations, we have to import our modules for the configurations to use. In the article for Powershell DSC, we simply called the modules using "Import-dscresource". In Azure, however, it's as easy as searching for them in the Modules section, and adding them. To do this, navigate to your automation account, scroll down to Modules gallery, then search for the module you want to use in your configurations.

For instance, PSDSCResources. Once you find it, click the "import" button at the top. Aftewards, head back to the Modules section and check the status. The imported modules should say "Available" in their status. Once you have all the modules you want to use, carry on to step 2.


Configuration WebsiteTest {
# Import the module that contains the resources we're using.
Import-DscResource -ModuleName PSDscResources
# The Node statement specifies which targets this configuration will be applied to.
Node 'WebServer1' {
# The first resource block ensures that the Web-Server (IIS) feature is enabled.
WindowsFeature Webserver {
Ensure = "Present"
Name = "Web-Server"
}
File HelloWorld {
Ensure = "Present"
Destinationpath = 'C:\test\hello.htm'
Contents = "<HTML>
<HEAD>
<TITLE>Hello World Example</TITLE>
</HEAD>
<BODY>
<H1>Hello</H1><P>World</P>
</BODY>
</HTML>"
}
# The second resource block ensures that the website content copied to the website root folder.
File WebsiteContent {
Ensure = 'Present'
SourcePath = 'c:\test\hello.htm'
DestinationPath = 'c:\inetpub\wwwroot'
}
}
}
The script is already pretty close to what we want. We'll simplify it a bit for reasons that will make sense later.
What we want to do is change Node 'WebServer1' to Node 'localhost'. This is because of the way that DSC configurations are assigned to the VM's. Instead of the pull server we talked about in the previous article, DSC in Azure is a bit more hands-off in this regard. The VM's have whats called an Azure Virtual Machine Agent baked in when they're created, it allows Azure to talk to the OS within the VM, the agent comes with a Microsoft Powershell DSC extension. This is what DSC uses to inject the configuration files. It's really the magic that allows DSC to work so well in Azure. During the running of the script later, Azure will automatically update this extension.


On to creating our configurations. Once you have your configuration code laid out, and you've changed your node name to localhost, you want to save the configuration. The name of the file MUST match the name of the configuration. In the case of the script above, we have a configuration name of "WebsiteTest", thus, the file should be named "WebsiteTest.ps1". This is a requirement of DSC in Azure.

Once we have our saved .PS1 script, we're ready to upload it to Azure, finally! Within Azure, navigate to your automation accounts, click on your account name to expand the properties blade, and click on DSC Configurations.

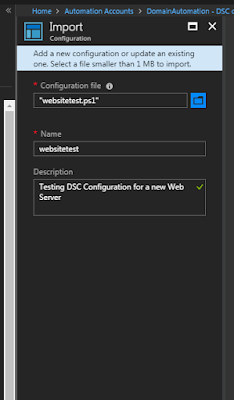
Once the DSCconfigurations is open, click "Add a configuration". On the following pane, you'll be able to add your .ps1 configuration script. It'll automatically generate a name. If the configuration definition doesn't match the filename, you'll get an error here. Add a description if you like, and then click OK at the bottom to complete.

Once imported, your brand new DSC configuration will appear in the DSC Configurations tab:

Clicking on it will take you to it's properties pane. From here, you can compile your configuration into a MOF file that can be distributed to new VM's. When you click compile, the automation account will read the script, attempt to call the modules (stated in the "import-dscresource" part of the script) and complete the creation of the MOF file.
When you click compile, the compilation job will appear on the configuration properties page. When it's complete, you'll see that the status changes to "complete".

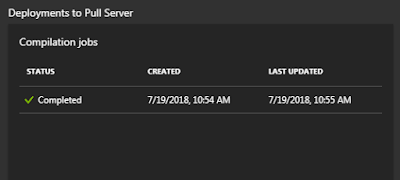
Once the compile job has finished, the compiled MOF file will be available in the DSC node configurations tab of the automation account. The name of the file is represented by the format of $configurationname.$nodename. Where $configurationname is the name of your configuration (in the DSC configurations tab) and $nodename is the name of the node specified within the configuration script. in our case with Websitetest configuration, you'll get websitetest.localhost.

There's not much else to see here, just that it exists. Once you have that in place, congratulations, you now have the underpinnings to deploy VM's with DSC. We'll now move on to the structure of our script.


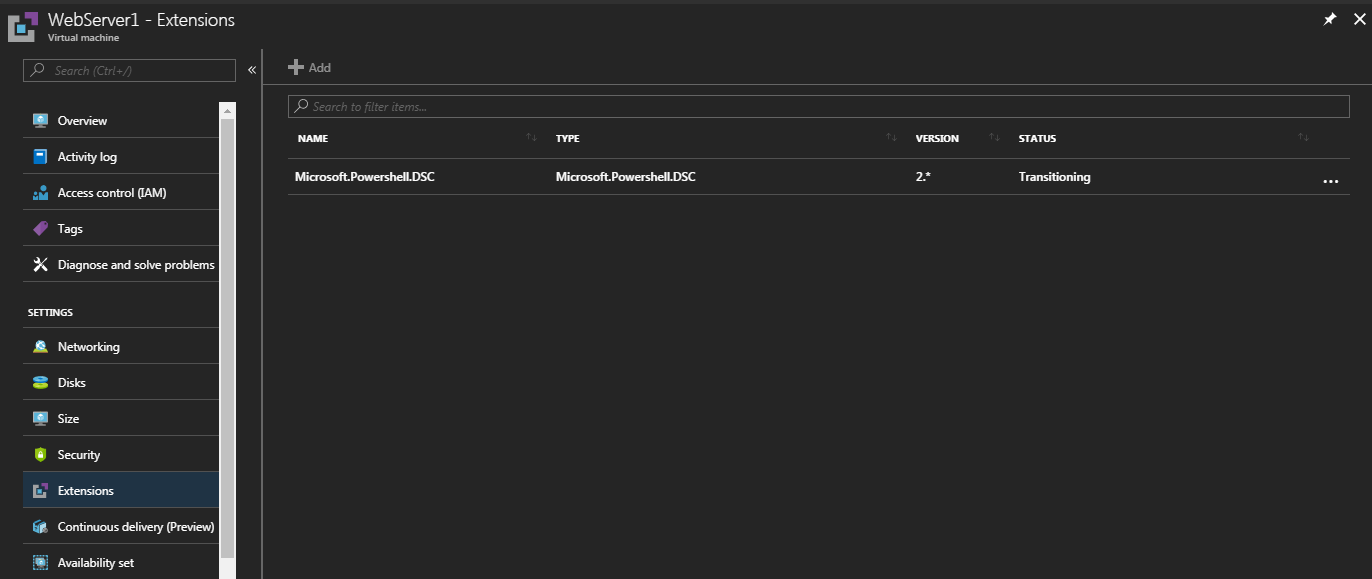
Once your script finishes, it will have the node configuration applied to it and we can verify by going to the DSCNodes tab under our automation account:

Clicking on the VM itself we can get a bit more info about it:

We can see that the configuration has been successfully applied and the status is compliant.
If we connect to our VM, we can look and see that our IIS web server has been configured and is up and running
Navigating to our external IP (because we added a publicipaddress parameter in our vm creation) and to our hello.htm file, we can see that it was configured:
And that's all there is to it! No sweat right?
This setup assumes you know a bit about how to use Azure already. At this point, you have at least the following configured:
- A Resource Group
- A Storage Account
We'll be walking through creating an Azure Automation Account, Adding DSC configurations and compiling them, and then constructing our script. If you already have an automation account, skip to step 2.
Before we begin
The solution makes use of powershell's AzureRM module from powershell, you can install it on your local machine (on WMF 5.0 or newer), with the command Install-Module AzureRM. Accepting the prompts will install and unpack the Azure remote powershell tools.
This gives you access to all the fun commands we'll be using. From here, we'll break down the process of how the script works and what you'll need in place before hand.
Step 1. Azure Automation Setup
As we learned from A True Beginners Guide to Desired State Configuration (DSC), DSC is pretty powerful stuff. This is the biggest part of the success of this project. First we'll need to understand how Azure DSC is different from Powershell DSC, and then walk through the process of creating the resources we'll need to have in place before we can start writing our automation script.
1a. Automation Account:
An automation account is required to use DSC. Its simple to implement. On the portal, you can click "Create a resource", search for "automation", click the option at the top that says Automation by the Microsoft publisher. In the next pane, click "Create" at the bottom. On the next pane, enter the name of the automation account, select the resource group, select the location, and click Create. Now you have an automation account with which we can configure VM's using DSC.

1b. DSC Modules:
Before we can actually use any of the configurations, we have to import our modules for the configurations to use. In the article for Powershell DSC, we simply called the modules using "Import-dscresource". In Azure, however, it's as easy as searching for them in the Modules section, and adding them. To do this, navigate to your automation account, scroll down to Modules gallery, then search for the module you want to use in your configurations.

For instance, PSDSCResources. Once you find it, click the "import" button at the top. Aftewards, head back to the Modules section and check the status. The imported modules should say "Available" in their status. Once you have all the modules you want to use, carry on to step 2.

Step 2. DSC configurations
We first need to have our powershell configuration .ps1 script in place. Lets go back to our webserver configuration we had in the article above:Configuration WebsiteTest {
# Import the module that contains the resources we're using.
Import-DscResource -ModuleName PSDscResources
# The Node statement specifies which targets this configuration will be applied to.
Node 'WebServer1' {
# The first resource block ensures that the Web-Server (IIS) feature is enabled.
WindowsFeature Webserver {
Ensure = "Present"
Name = "Web-Server"
}
File HelloWorld {
Ensure = "Present"
Destinationpath = 'C:\test\hello.htm'
Contents = "<HTML>
<HEAD>
<TITLE>Hello World Example</TITLE>
</HEAD>
<BODY>
<H1>Hello</H1><P>World</P>
</BODY>
</HTML>"
}
# The second resource block ensures that the website content copied to the website root folder.
File WebsiteContent {
Ensure = 'Present'
SourcePath = 'c:\test\hello.htm'
DestinationPath = 'c:\inetpub\wwwroot'
}
}
}
The script is already pretty close to what we want. We'll simplify it a bit for reasons that will make sense later.
What we want to do is change Node 'WebServer1' to Node 'localhost'. This is because of the way that DSC configurations are assigned to the VM's. Instead of the pull server we talked about in the previous article, DSC in Azure is a bit more hands-off in this regard. The VM's have whats called an Azure Virtual Machine Agent baked in when they're created, it allows Azure to talk to the OS within the VM, the agent comes with a Microsoft Powershell DSC extension. This is what DSC uses to inject the configuration files. It's really the magic that allows DSC to work so well in Azure. During the running of the script later, Azure will automatically update this extension.

On to creating our configurations. Once you have your configuration code laid out, and you've changed your node name to localhost, you want to save the configuration. The name of the file MUST match the name of the configuration. In the case of the script above, we have a configuration name of "WebsiteTest", thus, the file should be named "WebsiteTest.ps1". This is a requirement of DSC in Azure.

Once we have our saved .PS1 script, we're ready to upload it to Azure, finally! Within Azure, navigate to your automation accounts, click on your account name to expand the properties blade, and click on DSC Configurations.

Once the DSCconfigurations is open, click "Add a configuration". On the following pane, you'll be able to add your .ps1 configuration script. It'll automatically generate a name. If the configuration definition doesn't match the filename, you'll get an error here. Add a description if you like, and then click OK at the bottom to complete.


Once imported, your brand new DSC configuration will appear in the DSC Configurations tab:

Clicking on it will take you to it's properties pane. From here, you can compile your configuration into a MOF file that can be distributed to new VM's. When you click compile, the automation account will read the script, attempt to call the modules (stated in the "import-dscresource" part of the script) and complete the creation of the MOF file.
When you click compile, the compilation job will appear on the configuration properties page. When it's complete, you'll see that the status changes to "complete".


Once the compile job has finished, the compiled MOF file will be available in the DSC node configurations tab of the automation account. The name of the file is represented by the format of $configurationname.$nodename. Where $configurationname is the name of your configuration (in the DSC configurations tab) and $nodename is the name of the node specified within the configuration script. in our case with Websitetest configuration, you'll get websitetest.localhost.

There's not much else to see here, just that it exists. Once you have that in place, congratulations, you now have the underpinnings to deploy VM's with DSC. We'll now move on to the structure of our script.
Step 3. New-AZVM script creation.
In this short example, there are 3 parts to the script.- Configure the variables for your new vm, such as setting the local admin account and password, and prompting for the name of the VM. You could also run part of this script as a runbook that kicks off as the result of a specific event, which would make this part unnecessary, but for this demo, we'll use it for simplicity.
- Create the VM. We specify the parameters the VM needs such as the local admin credentials, the resource group name, the locational region in which its stored, the virtual network, the subnet, associated security groups, any public ip address resources you want to use, as well as any open ports. For our web server, we'll be using the last two, but they're not required.
- Assigning the dsc node configuration to our vm. We use the command Register-azurermautomationdscnode and use the parameters for the automation account that will execute the assignment, location, resource group, as well as the specific dsc node configuration file we wish to assign. When this command runs, it applies the mof file to the VM. This is why the node name must be "localhost", so that the start-dscconfiguration command embedded in the dsc extension applies the configuration to the machine.
Should any of the specified parameters not exist in your network for the creation of the vm, Azure will create them for you automatically.
Here's a look at my sample script:

You could always use the get-azrm* commands to assign your different resources to the variables before running the script.
Before we run this specific script, we'll have to log into azure from our local powershell session with connect-azurermaccount:

once we're authenticated, we can go ahead and run the script!

There's a lot happening here, so we need to be patient.


Clicking on the VM itself we can get a bit more info about it:

We can see that the configuration has been successfully applied and the status is compliant.
If we connect to our VM, we can look and see that our IIS web server has been configured and is up and running
 |
| Local IIS services are running |
 |
| Hello.htm is in place and is being served up by IIS. |
Navigating to our external IP (because we added a publicipaddress parameter in our vm creation) and to our hello.htm file, we can see that it was configured:
 |
| Success! |
And that's all there is to it! No sweat right?
Conclusion:
We walked our way through the process of creating our automation account, uploading and creating our configurations, and finally, constructing a script that creates a VM and assigns the configuration to it. In this way we can have a lot of functionality that Azure brings to bear. We can go further and assign runbooks to execute this kind of code when a certain criteria is met, or deploy packs of servers at once. Go forth and automate!
Issues I encountered:
As usual, doing something different doesn't always go smoothly, here are the issues I ran into and how I went about solving them:
I encountered an error while compiling my first configuration, the error was to the effect of "Cannot find resource referenced: xPSDesiredStateConfiguration". I thought "Hm, thats funny, I did import that module". Turns out, the module import failed. I had to call a similar module instead of this one and that sorted everything out.

퀴라소 라이선스의 특징으로는 하나의 라이선스로 다양한 종류의 사행성 게임(경마, 경륜, 카지노, 복권, 스포츠토토 등)을 동시에 진행할 수 있는 것이라고 관계자는 밝혔다. 검증되지 않은 온라인 사이트를 이용하시면 먹튀 및 많은 불이익을 당할 수 있으시기 때문에 꼭 검증받은 제휴 카지노 사이트를 이용하시기 바랍니다. 저희 토지노의 검증을 통해서 토토 https://gri-go.com/ 먹튀사이트 먹튀업체로 확정된 사이트는 커뮤니티 검증페이지에 리스트가 게시 되어지며 확인가능하십니다.
ReplyDelete